
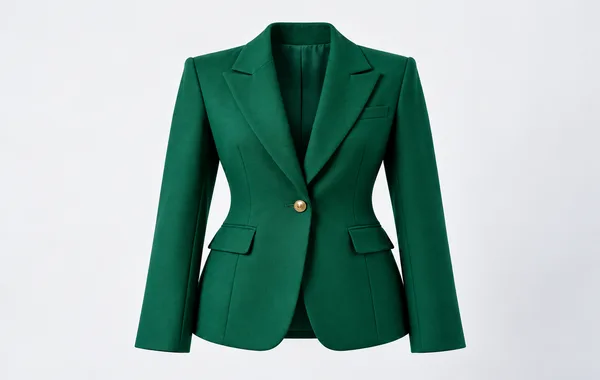
In e-commerce apparel presentation, brands face an ongoing visual compromise. Flat-lay photography is affordable but lacks three-dimensional drape and realistic body contour. Live-model photography provides excellent shape but introduces significant financial overhead: model agency casting fees, hair and makeup artists, studio day rates, and restrictive multi-territory usage rights.
The ghost mannequin technique (also known as the invisible mannequin or hollow mannequin effect) solves this dilemma. By photographing garments on a physical mannequin and digitally compositing secondary inside-collar shots, retouchers create the illusion of an invisible, three-dimensional body wearing the clothing.
However, an impeccable ghost mannequin composite begins long before Photoshop—it starts on the studio floor. If studio photographers fail to capture the correct perspective, lighting angle, and fabric alignment during the shoot, realistic 3D neck reconstruction becomes impossible. This technical guide outlines the exact 3-shot studio capture protocol, camera geometry, and styling techniques required to shoot apparel for seamless ghost mannequin compositing.
1. Studio Equipment & Camera Geometry Blueprint
Before dressing the mannequin, studio photographers must lock in optical geometry to prevent perspective mismatch:
| Equipment Parameter | Recommended Specification | Technical Purpose |
|---|---|---|
| Camera Lens Focal Length | 85mm to 105mm Prime Lens (Full-Frame) | Eliminates wide-angle barrel distortion; preserves true shoulder width and proportional hem drop. |
| Aperture Setting | f/8 to f/11 @ ISO 100 | Guarantees deep focal depth from front lapel buttons to the rear collar stitching. |
| Camera Tripod Height | Locked at mid-chest height (perpendicular to garment) | Prevents keystone perspective distortion when shooting front and neck insets. |
| Mannequin Type | Matte white fiberglass with removable neck/chest cutouts | Eliminates gloss reflections; magnetic removable neck blocks minimize neck reconstruction area. |
| Background Lighting Ratio | Background strobes +1.5 to +2.0 stops above Key Light | Creates clean, pure white background separation without wrapping backlight flare around fabric edges. |
2. The Essential 3-Shot Studio Capture Protocol
To produce an authentic hollow garment deliverable with three-dimensional depth, photographers must execute a disciplined multi-shot sequence:
Shot 1: The Front Primary Hero Shot
Dress the garment on the mannequin with meticulous attention to symmetry. Fasten primary buttons or zip closures to the desired styling point. Pin loose fabric tightly at the back of the mannequin using studio clamps, creating a tailored, wrinkle-free front silhouette. Align shoulders horizontally, smooth lapels, and ensure the bottom hem falls naturally.
Shot 2: The Inner-Neck & Lining Inset Shot
This is the most critical shot for post-production assembly. Remove the garment from the mannequin, turn the upper collar inside-out, and mount it either backward onto the mannequin or onto a clean white foam core board. Do not move the camera tripod or alter lighting output. Position the inner collar at the exact same vertical height and focal distance as the front shot. Ensure the woven brand label, sizing tag, and neck stitching are fully visible, flat, and evenly lit.
Shot 3: The Back & Tail Hem Shot (Outerwear & Asymmetrical Garments)
For blazers, winter coats, high-low dresses, and curved-hem shirts, the front view reveals the inner rear hem. Rotate the mannequin 180 degrees to photograph the back hem drop under identical lighting, enabling the digital artist to reconstruct realistic interior depth beneath the front waistline.
3. Styling Nuances by Garment Category
Different apparel categories require distinct physical styling techniques on the studio floor:
- Button-Up Dress Shirts & Polos: Fasten the second and third buttons while leaving the top collar button open to showcase a clean V-neck contour. Insert clear plastic collar stays to prevent collar points from curling inward.
- Heavy Winter Outerwear & Puffer Jackets: Zip jackets approximately one-third of the way up. Use double-sided tape inside the storm flap to hold the zipper placket parallel without puckering. Stuff sleeves lightly with acid-free tissue paper to prevent flat, lifeless sleeve folds.
- V-Neck Knits & Delicate Fabrics: Use small magnetic styling clips placed internally to avoid puncturing fine knitwear. Ensure the inner collar inset captures both the back neck tape and shoulder seam joining stitches.
4. Post-Production Assembly: What Digital Artists Need
Once raw files are delivered to the digital retouching studio, retouchers execute a complex multi-layer Photoshop assembly:
- Manual Vector Isolation: Hand-drawn Pen Tool paths isolate the front garment silhouette from the physical mannequin neck and arms.
- Perspective Alignment: The inner-neck inset layer is aligned beneath the front opening, scaling the collar curve to match the natural drape of the shoulders.
- Fabric Texture Cloning: Retouchers bridge minor seam gaps using non-destructive clone stamping and warp adjustments, matching the authentic weave direction.
- Cast Shadow Generation: Realistic interior drop shadows are painted beneath the front collar onto the rear inner lining, creating the optical perception of 3D interior hollow depth.
5. Studio Pre-Flight Inspection Checklist
Before striking your lighting setup, verify these quality standards on your tethered studio monitor:
- [ ] Camera Position Locked: Tripod locked firmly; zero shift in focal distance between front and neck inset shots.
- [ ] Label & Sizing Tag Visible: Inner-neck label is perfectly centered, illuminated, and crisp without harsh specular glare.
- [ ] Symmetrical Shoulders: Left and right shoulder seam heights match within ±5 pixels on the grid overlay.
- [ ] Color Temperature Consistency: All strobes calibrated to 5500K with zero ambient tungsten or fluorescent contamination.
- [ ] Deep Depth of Field: Aperture set to f/8 or f/11; all fabric textures sharp from front placket to rear collar.
Transform Studio Apparel Captures into Flawless 3D Ghost Mannequin Assets
ClipPathPro’s dedicated apparel compositing team edits thousands of fashion garments daily for global apparel brands and commercial studios. We assemble complex neck joints, align asymmetrical hems, and generate realistic natural interior shadows within guaranteed 24-hour turnarounds.
Explore Ghost Mannequin Photo Editing Services Test 3 Garments Free →
Frequently Asked Questions
Why is it impossible to create a convincing ghost mannequin effect with only a single front photograph?
A single front photograph on a mannequin covers the inner back collar, brand label, and neck lining with the physical mannequin neck. Without a secondary shot of the inside collar taken at the exact same focal distance, a retoucher has no authentic fabric texture, stitching, or brand tag to composite into the void.
What camera lens focal length prevents perspective distortion in apparel photography?
Use an 85mm to 105mm prime lens on a full-frame sensor. Wide-angle lenses (below 50mm) cause barrel distortion, making shoulders appear artificially wide and lower hems tapered, resulting in geometric misalignment when compositing front and back shots.
How should photographers position the camera when shooting inner-neck inset shots?
Maintain the exact tripod position, camera height, and lighting power used for the front shot. Turn the garment inside-out on a foam board or mount it backward on the mannequin chest, aligning the back collar curve to match the front neck scoop.
What is the recommended lighting ratio for shooting ghost mannequin apparel?
Set background strobes 1.5 to 2 stops higher than key and fill lights to blow the seamless paper to pure white without wrapping backlight around garment edges. Use a key light at 45 degrees with a large octabox and a reflector on the opposite side to retain texture in dark knits.